Thursday, December 27, 2012

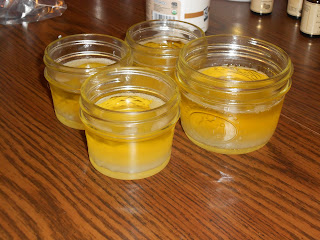
Basic Healing Skin Balm

My husband asked me to make some stuff for his foot today, so I quickly got to work and threw together a healing skin balm.  Knowing his specific needs, I was able to look through the list of essential oils and their benefits and tailor my concoction especially for him.

You see, last year after his back surgery, he was left with some nerve damage that affects his right leg and foot.  He no longer feels hot or cold, nor does he sweat on that foot.  Some may think that's kinda cool!  Right?  But actually, that leaves his one foot excessively dry without the natural moisturizing properties that sweat can bring along with it.  His right foot looks and feels as though it belongs to a completely different person than his left!  It's dry, rough, and cracked.

So, I looked through the list of essential oils and picked out the ones that were beneficial to dry skin, chapped skin, poor circulation, or mature skin.  Then looked through my stash and pulled out the ones I had on hand.  There were several more that could have worked that I just didn't have in the cabinet, but the ones I did have and used were:  Myrrh, Cedarwood, Rosemary, Eucalyptus, and Tea Tree.  I used a total of 100 drops of essential oils.  You can mix and match any oils for any purpose that you'd like.  So, here's the basic recipe.

4 Tablespoons of organic extra virgin coconut oil ( I get mine from Vitacost)
2 Tablespoons of Beeswax pellets, or shredded beeswax
1/2 teaspoon of raw local honey

Essential oils of your choice, specific for the benefit you need out of them. (I really like Mountain Rose Herbs Organic 100% pure essential oils)  If you need help knowing which oils to use, this link will take you to a chart of oils and a short clip of it's benefit.  

I used:

Myrrh - 30 drops
Cedarwood - 20 drops
Rosemary - 20 drops
Eucalyptus - 15 drops
Tea Tree - 15 drops

Ok, so using a double broiler or similar to melt the coconut oil, cocoa butter (or other butter) and beeswax together.  When it's thoroughly melted and incorporated, remove from heat and stir in your honey and essential oils.  Pour into your container and let cool.

That's it!  Makes one 4 oz. container.

The possibilities are truly endless with this basic recipe.  It's so easy to change up the essential oils to whatever you need it to do.  Relieve muscle aches, arthritis, acne, oily skin, etc etc etc.  Enjoy!

Sunday, December 16, 2012

Choco-mint Lip Balm

Another super easy recipe.  When I was looking for a lip balm recipe, the number of results was overwhelming.  I ended up basically taking my knowledge and previous experience with making stuff and throwing something together.

Why?  Well, cause like I said, it was overwhelming.  Plus, almost every recipe had an ingredient in it that I didn't have on hand.  So, I just had to wing it.

With that in mind, know that lip balms are incredibly flexible.  Meaning, it's difficult to mess it up.  Even if you think you messed it up, it's likely still usable, so don't sweat it.

My recipe....sort of.  ;)

2 Tablespoons of coconut oil (I get mine from Vitacost.  BTW, if you're new to Vitacost and sign up using my link, we both get a $10 code!)
1 Tablespoon Pure Cocoa Butter (this makes the chocolateyness.  Can be purchased at Frontier, health food stores, or at Mountain Rose Herbs)
1 Tablespoon Beeswax (can also be purchased at any of the same above places)
8 drops of Peppermint Essential Oil (I prefer Mountain Rose Herbs brand)
1/4 teaspoon of honey

In a double broiler, or similar, melt your coconut oil, Cocoa Butter, and beeswax together.  If you use the little beeswax pellets, I've learned that you have to continue heating a few minutes longer than you THINK they've melted.  :)  Just to be sure.  Once it's all melted, remove from heat, add the honey and essential oils and stir.  Pour into your awaiting balm containers.

That's it.  Done!  Takes all of about 10 minutes.  Recipe yield was 4 - 1/4 ounce lip balm containers, which I purchased from Frontier for $2.70 for 6 containers.  You can truly use anything though.


Homemade cough/throat drops

If you've ever made rock handy, or homemade peppermints, you can easily do this project!

It's the same principle of bringing a liquid and a sweetener to 300 degrees, adding in some other good stuff, letting it cool and wahlah!

The players for this project will be:

3 bags of Throat Coat tea (can purchase just about anywhere, but can also get it at Vitacost or Frontier )
1 1/4 cups of water
1 1/3 cup of sweetener of choice (sugar, honey, mix of both, whatever....honey will be a bit gooey-er than just sugar and will likely stick to your teeth a bit)
1/4 teaspoon of menthol crystals (purchased from here)

100% pure essential oils  NOT precious essentials or diluted essential oils.  They must be pure essential oils. There are tons of different brands, it doesn't matter the name on them, just make sure they are pure and not diluted in a carrier oil already.  Personally, I'm a huge fan of Mountain Rose Herbs oils because they are Certified Organic as well as affordable.  But use what you love.  It's all good!

15 drops lemon essential oil *
15 drops of peppermint essential oil *
10 drops eucalyptus essential oil *
5 drops of tea tree essential oil *
5 drops of lavender essential oil *

Either a candy mold, or a greased pan to pour your hot concoction on when it's ready.

I bought a candy mold at Hobby Lobby with a 40% off coupon.  It was less than $2.  However, it would have been fine to have just poured into a greased cookie sheet and used a knife to etch a line (cut it) as it started cooling to make for easy breakage when fully set.  (I've used that trick on rock candy before and it works well!)

Okey Dokey let's move along and get started.

Put your 3 Throat Coat tea bags in the water and bring it to a boil.  Boil for 5 minutes.  Remove from heat and cover.  Let steep for 15 minutes.  You want a really strong tea.  After steeping, remove your tea bags squeezing every last drop of strong medicinal goodness out of them and discard.

Add your sweetener of choice and bring back to a boil.  Reduce heat so it doesn't scorch.  If you can, clip your thermometer to the side of the pan so that the tip is in the liquid, but not touching the bottom of the pan. You'll also want to make sure your pan is large enough that your tea and sugar mix doesn't boil over.  It does raise quite a bit as it cooks.

In the meantime, lightly grease your molds or pans with a bit of coconut oil.  It will make it easier to remove your cough drops later on.

Once your concoction has reached 300 degrees, remove from heat.  Give it a minute to settle down a bit and add your menthol.  It WILL release vapors as it hits the contents of the pan!  Do NOT breath in the vapors! So stand back a bit when you do this.  Stir it in.  Add in your essential oils.

You'll want to work quickly, but carefully, to get it all stirred up and poured before it starts hardening.

If using a cookie sheet, remember to take a knife and 'cut' as it's hardening to essentially draw the lines to help it break in the right places.

That's it!  You're done!  Just let it cool and use as necessary!  If you'd like to store them in a container rather than wrap each one individually, you can dust with powdered sugar to prevent them from sticking to each other.


Now, here's the educational section.  Why those particular essential oils?  Here's the breakdown of their beneficial properties.


*lemon oil benefits - Antibacterial, antidepressant, antifungal, anti-inflammatory, antimicrobial, antirheumatic, antiseptic, antispasmodic, astringent, carminative, digestive, diuretic, hepatic, hypotensive, laxative, sedative, vermifuge

*peppermint oil benefits - Analgesic, anesthetic (topical), antibacterial, anti-inflammatory, antifungal, antimicrobial, antiseptic, antispasmodic, astringent, carminative, cholagogue, cordial, digestive, emmenagogue, expectorant, febrifuge, insecticide, nervine, sedative, stimulant, stomachic, vasoconstrictor, vermifuge

*eucalyptus oil benefits - Analgesic, antibacterial, antifungal, antineuralgic, antirheumatic, antiseptic, antispasmodic, antiviral, decongestant, deodorant, depurative, diuretic, expectorant, febrifuge, stimulant, vermifuge, vulnerary

* tea tree oil benefits - Analgesic, antibacterial, antifungal, anti-inflammatory, antimicrobial, antiparasitic, antiseptic, antiviral, decongestant, deodorant, diaphoretic, expectorant, fungicidal, immune stimulant, insecticide, vulnerary

* lavender oil benefits - Analgesic, antibacterial, antidepressant, anti-inflammatory, antimicrobial, antirheumatic, antiseptic, antispasmodic, aromatic, carminative, cholagogue, deodorant, diuretic, emmenagogue, hypotensive, insecticide, nervine, sedative, stimulant, stomachic, vulnerary


As you see.  4 out of the 5 oils contain analgesic properties!  Pain relievers!  As is menthol.  All of the oils are antifungal, antibacterial, and antiseptic!  Helping you get better faster!  So enjoy your awesome healthy homemade creation!  :)

Thursday, December 13, 2012

Homemade Organic, Petroleum Free, "vapo" rub


Petroleum.  Derived from crude oil, is not what you want to be breathing into your lungs.  Or absorbing into your skin.  Especially not when you're sick!  Sure, the menthol and camphor helps you breath, clears the nostrils, and even reduces coughing.  But why not get the benefits without the petroleum?  It's simple enough!

Here's how ya do it.

First, gather all of your supplies.


8 teaspoons beeswax pellets or grated
4 tablespoons cocoa butter, shea butter, mango butter, kokum butter, etc.  (can be purchased here.)
1 cup coconut oil (I like to order from Vitacost.  I order 2 big containers of Vitacost brand and get free shipping even!)
2 teaspoons menthol crystals (can be purchased here)
40 drops each eucalyptus, camphor, rosemary, peppermint, and lavendar
30 drops cinnamon bark  (all of the oils I used for this came from Mountain Rose Herbs.  They are Certified Organic and of excellent quality and price!)

Using a double broiler, or similar, melt beeswax, butters, and coconut oils together.


Once everything is thoroughly melted, add in the menthol crystals.  Stand back when you do this!  The fumes are potent and you do not want to breath them in!  Menthol is a solid at room temperature, but melts somewhere between 105 and 110 degrees.  You'll want to make sure your oils are at least that warm to add and melt the menthol.

Remove from heat and add in your essential oils.  Stir together, then pour into the containers you'll want to store your new rub in.


It starts cooling and hardening up almost instantly!

Rub on feet to mellow coughs, rub on chest, back, under nose to help breathing if dealing with colds and flu.

*****  However, DO NOT use on children under 6!!!!  Do NOT rub on their chest, under noses, etc of small children!  Children have been hospitalized from high rates of menthol from essential oils like Peppermint, Camphor, and Eucalyptus.  It can cause severe responses and their throat to close up!  Would probably be ok to rub on feet and cover with socks for older children though, and is fine for adults.*******

Great stuff and much better for you than the petroleum based ones!  Very similar to the more natural ones you can purchase as well!  For comparison, here is the back side of a natural rub that I had on hand.  See the ingredients list!


So, there ya go!